





Sanpo-yoshi Communication
Sanpo-yoshi Communication
Printing Column] Embossed seal embossing

The other day, a designer asked me this question.

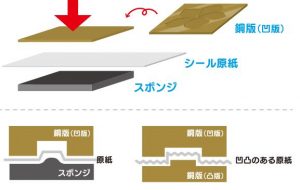
Raised embossing is performed using a foil stamping machine. A copper plate is created using intaglio printing and placed on top, while a firm, rubber-like sponge is placed underneath. When pressure is applied, only the recessed areas press against the sponge, causing the paper to be pushed into the recesses.
On a foil plate, the sponge tends to compress more in the areas that are not recessed. Since this sponge naturally functions as a relief plate, it is effective in preventing tears in the paper during embossing. If the paper itself has uneven surfaces, the sponge will be affected by these irregularities; in such cases, both a relief plate and an intaglio plate are created and sandwiched together to produce the embossed effect.
In addition, the embossing effect varies depending on the type of paper. Since foil paper has a foil layer on its surface, it is easy to emboss, and the paper springs back slightly after embossing. On the other hand, synthetic papers such as Yupo spring back significantly, so they are not suitable for embossing.
So, I asked the designer about the type of paper they were using, and they replied, “It’s foil paper.” Since embossing tends to hold up well on foil paper, I was relieved. So, just how fine of a line can be embossed on foil paper?
The paper is approximately 0.15 mm thick. Based on my estimates, a height of four times the paper’s thickness (about 6 mm) should be sufficient to create a raised effect. When creating a relief plate, leave a gap of about 0.2 mm between the intaglio and relief sections. Since the relief plate is made of resin and should be about 0.5 mm thick, the intaglio plate needs to be at least 0.9 mm thick. The foil plate manufacturer said it should be at least 1 mm thick.
However, my question this time is how fine the details can be made. Since foil stamping operators often keep samples of products that were difficult to produce in the past, I asked if they had ever produced a product with the finest embossing details to date.
It turned out that, when it came to embossing, he had compiled all his past work into a single notebook (amazing!!). Looking at each embossed piece, I realized that there are three stages to the embossing process.
① Embossing formed in the recessed areas when pressure is applied to the paper
The thin 0.3 mm line leaves no imprint on the reverse side, but a faint pattern appears on the front. This is a slight concave embossing caused by the paper itself being compressed by the printing plate, with no pressure applied to the recessed areas of the plate. Although there is almost no difference in height when touched by hand, the pattern can be faintly discerned.
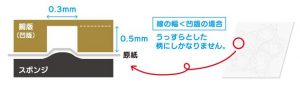
② Embossing where the paper does not reach the bottom of the embossed recess, despite the influence of the force applied from the back
The 0.5 mm line leaves a faint impression on the reverse side. Although there is a slight step, the embossing is shallow. This is likely because the width of the indentation is so small that even when pressed with a sponge, the paper does not reach the bottom of the embossing die.
③ Embossing where the depth of the recessed area reaches 0.5 mm
Although the embossing does not reach a height of 0.5 mm due to compression recovery, it still results in a solid embossed pattern. A width of at least 1 mm is required, and wider embossing provides greater stability.
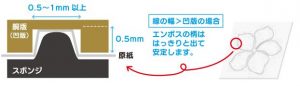
While researching this, I made an interesting discovery. Using the same foil plate, effects ① through ③ occur simultaneously. Depending on how you use it, you can create three different levels of embossing by varying the line thickness. I haven’t intentionally created anything like this before, but I realized that doing so would expand my range of expressive possibilities.
I explained to the designer, while referring to my notes, that “the minimum line width is determined by the height of the embossing you want to create.” I’d like to thank the designer, whose insight sparked this interesting realization, and the operator who took embossing samples for me in my notebook.